![]()
This pattern is licensed under a Creative Commons License and is Copyrighted 2009 by Pauline Harding.
This Web Page by Pauline Harding for Art Nurk, askpauline@comcast.net
All content, including text, photos, and pattern, are copyright 2007.
Contents may be copied for personal use if credit is given.
![]()
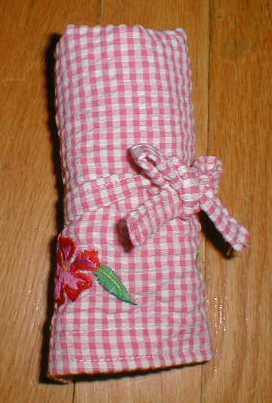
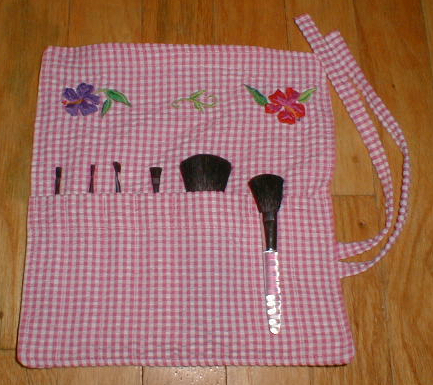
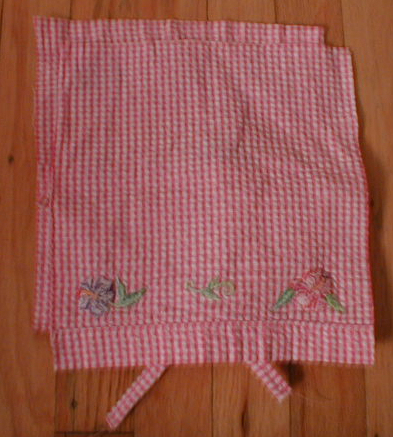
This roll-up case for makeup brushes is very easy to make, and helps keep your brushes clean and organized. Plus, it's cute! I made one from striped home dec fabric samples, and another from a child's gingham dress. Try making your own!
SUPPLIES:
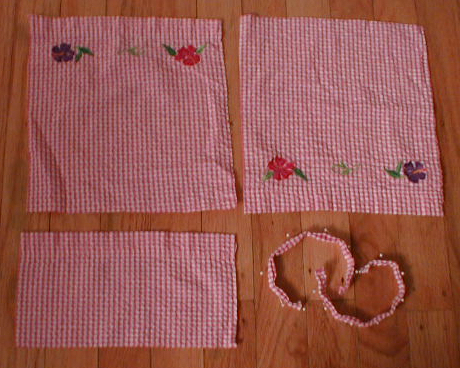
- Fabric - four pieces of fabric, 8.5" x 9", or one fat quarter. I used some samples of home dec fabric from a sample book for one, and a child's gingham dress for another. You could upcycle some fabric from used clothing, and even use fussy cutting to include decorative details from the original garment. Choose fabric that's lightweight and sturdy, but not stiff.
- Sewing machine. You only need a straight stitch - no zig-zag or fancy stitches are used, and there's no need for a serger. (For that matter, you could do this by hand if you really wanted to.)
 CUT THE FABRIC:
- Outside - 8.5" x 9". This is the piece you'll see when the roll is closed.
- Inside back - 8.5" x 9". This is the piece that goes behind the brush pocket.
- Pocket - 8.5" x 9". This piece will be folded in half to make a 8.5" x 4.5" piece for the pocket. (For my gingham roll, I cut my pocket piece on the edge of the dress, so I cut the piece 8.5" x 4.5", and used the hem as the upper 8.5" edge.)
- Ties - Two pieces, 8.5" x 1.5 ". Or you could use some sturdy ribbon.
- This makes a roll that is 7.5" x 8" when open, with a pocket 4" deep. Of course, the size of the pieces can be changed to make a roll that fits more or different sized brushes.
SEWING YOUR MAKEUP BRUSH ROLL:
- Prepare the ties: Fold the fabric for the first tie lengthwise to make a piece 8.5" x 1". Press your thumbnail along the folded edge to make a fold line. Unfold. Now take each long edge and fold it in 1/2", wrong sides together, to meet the fold line you made. It will be 8.5" x 1". Now fold it in half lengthwise so that the long raw edges are on the inside; it will be 8.5" x 0.5". Pin.
To enclose the raw edges of one end of the tie, unfold the end, turn in the short end about 1/4", re-fold and pin. (You only need to do this on one end, as the other will be enclosed in the seam of the roll.)
Now sew along the length of the tie and across the end.
(If you are using ribbon ties, no folding or sewing is needed; you just have to cut them to size. Cut the ends on a diagonal to minimize fraying. ) 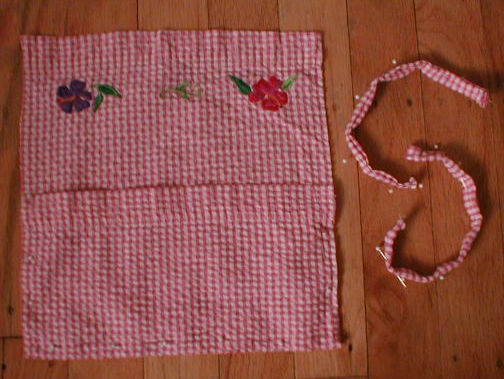 Prepare the pocket. Fold the pocket piece in half , wrong sides together, so that it measures 8.5" x 4.5". Topstitch along the folded edge. (If you have cut the pocket on the hem of a garment, you can skip this step.)
 - Baste the pocket to the inner back. Put the pocket, right side up, on top of the inner back, also right side up. Line the bottom 8.5" edge of the pocket with the bottom 8.5" edge of the inner back. Be sure the sides line up too; the pocket will come only part way up the side. (The pocket's folded edge will be across the middle of the inside back.) Pin. Stitch around the sides and the lower edge of the pocket, using a 1/4" seam allowance.
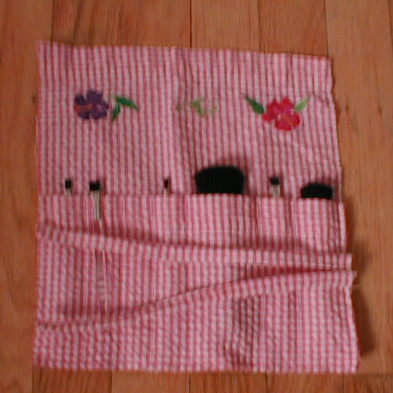 Stitch pocket compartments. Put the brushes into the pocket and pin to get an idea of the compartment widths you will need. When you are happy with the spacing, stitch straight lines from the bottom of the pocket to the top to divide the pocket into compartments for each brush. Backstitch for about half an inch at the top for reinforcement, and stitch in place three or four times to secure.
 - Attach the ties. Lay the two ties next to each other, along one edge of the pocket, a little more than half way up the pocket, with the raw edges along the pocket edge and the ties laying across the pocket. Pin. Stitch in place, using a 1/4" seam; backstitch to reinforce.
- Put on the outside cover.
 Put the outside cover piece on top of the pocket piece, right sides together. Pin. Be sure the ties will be out of the way of the stitching. (They will be sandwiched inside the two layers.) Starting on the top edge, about a third of the way to the side edge, begin stitching, using a 1/2" seam allowance. Stitch most of the way around, leaving a 3" opening along the top edge. You may want to backstitch at the points where the pocket begins and where the ties are attached, to make it more sturdy.
 - Trim corners. At the corners, cut off a bit of the seam allowance at a 45 degree angle, being careful not to cut too close to the seam. This will help make square corners. If you like, you can trim the seam allowance to 1/4".
- Turn right side out through the opening. Use a blunt chopstick to poke the corners out as much as you can. Pin the opening closed, tucking in the seam allowance.
- Topstitch around the entire square.
NOTES:
- Slanted pocket variation: Sometimes, brush rolls have a pocket with a slanted top so you can store brushes of different heights without them sinking down too far in the pocket. In this case, you'd want to cut two pocket pieces (one outer and one lining) and sew them together at the top (right sides together). Then turn them wrong sides together and topstitch. Make a paper pattern, and remember to cut one as a mirror image of the other. (That way, when you sew them together, your pocket will be the right shape.)
- Knitting Needle Roll Variation: This pattern, made in a larger size, would make a nice roll for crochet or knitting needles. Choose fabrics that are sturdy enough to resist being poked by the needles.
- Tool Roll Variation: Choose a sturdy fabric that will resist dirt and grease, perhaps from an old coat or backpack, or a sturdy pair of jeans. Choose a strong strap or cord for the ties.
MAKING A ROLL PATTERN:
- Want a different size roll? It's easy to make your own pattern.
- To make this pattern, I first laid my brushes on a piece of paper. I decided where the top of the pocket should be so that a bit of each brush would peek out of the top (to make them easy to remove), and how much of a flap I needed to hold them in place. The outside piece and the inner back are the same size. In my design, the pocket is also the same size. Once I decided on the finished size, I added 0.5" on each edge for a seam allowance. So for a finished size of 7.5" x 8" I needed to cut pieces 8.5" x 9".
- Once you have your pieces cut, you can roll them up to see how long your ties should be; remember they need to be long enough to tie easily. You can also figure out the best place to put the ties, so that they are in the middle of the roll when the flap is folded over.